Step 1: Ensure that the charging port is clean and dry.
Step 2: Plug the charger into the power outlet and connect the cable with the power
supply. Make sure the light on the charger is lit GREEN.
Step 3: Connect the charging cable to the charging port of the ebike battery.The
indicator light on the charger should change to RED, indicating that the battery
is now being charged. When the red light on the charger turns GREEN,this
indicates that the battery is fully charged. A full charge typically takes 8-9 hours.
The charger will automatically stop charging when the light is GREEN.
Step 4: Unplug the charger from the battery and the power outlet.
Step 5: Attach the charging port cover to protect the charging port.
NOTE: If the GREEN light on the charger does not turn RED when you plug it into the battery,check that all the connections are proper or that the battery is not already fully charged.
Disconnect the charger and turn off the E-Bike.Remove the battery.
Use a moist cloth to clean the E-Bike.Do not use oil on the brakes.
Do not use a high-pressure jet. Cleaning under running water is not recommended. After cleaning the E-Bike, make sure to test all the brakes before using the E-Bike again.
If you are storing the ebike for an extended period of time, please fully charge the battery at least once every two months.
If the ambient temperature of the storage location is below 0°, please do not charge the E-Bike. You must bring the battery into a warmer environment before charging. Check the Battery Information and Specifications sections for more details.
Clean and lubricate the chain and chain rings regularly to extend their life cycle.Clean no less than once a month with daily use, and more regularly in poor conditions or if the chain becomes noticeably dirty.
Regularly clean the chain with a suitable chain cleaner.
Clean the chain rings using a neutral cleaning detergent.
Use suitable lubrication on the chain and chain rings.
Routinely check the body and tires of the ebike for damage,excessive wear, and correct air pressure. Check all bolts and screws, and tighten if needed.
Check the side of the front and rear wheels for correct tire pressure.
The fasteners of the luggage carrier are to be secured and checked frequently.
The rims are subject to wear which must be checked to ensure they are intact.
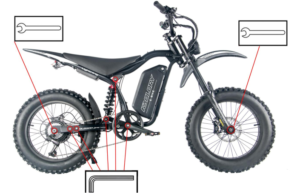
Check the brake pads for wear. If the brake pads are worn out, replace them immediately. See the photo below for which screws to check and secure after each ride.
You can lock the battery to the ebike by inserting the provided key and turning it clockwise.
If you need to unlock the battery to remove it from the ebike, insert the key and turn it
anticlockwise.
It is recommended to always lock the battery during use.
When the battery is removed, you can hold down the indicator button on the battery to display an estimate of the remaining battery power.

The maximum weight limit is 330lbs/150kg.
Battery:Rechargeable Li-ion Battery Pack
Model: EV007
Charging time:8-9 hours
Voltage: 67.2 Volts
Battery cells: 78 cells
Initial capacity:36 Ah
Operating temperature:-15-55℃
Charging temperature:0-55℃
Storage time:6 months
Storage temperature:0-25℃
Storage Humidity: 60(+/-25%)%
The supplied charger and battery must only be used together and are not suitable for other devices.
When the battery indicator shows low battery capacity, please charge the battery for 8-9 hours using the charger that you received in the ebike package.To fully recharge the battery,follow the instructions under“Charging your E-Bike”.
To use the battery, set the button on the side of the battery to on“-“.
You can turn the battery off by setting the button to “o” when not in use. You can still use the battery indicator button when the battery is off.
Model number: FDA158-672025
Input: 100-240V, 3A, 50/60Hz
Output: 67.2V=2.5A
Safety Tips for Charging
Charge the battery for at least 5 hours before first use.
To maximize battery life, please charge every other month when not in use and two days after driving. Please charge the battery at the suitable temperature.
Do not store the battery without charging it. Charge the battery at least once every 2 months. Only use the charger that was included in the box to charge the battery.
If any damage occurs to the charger or cable, stop using the charger and contact after-sales support to obtain a replacement.
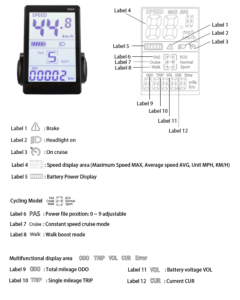
P01:Backlight brightness: the darkest level 1, the brightest level 3;
P02: mileage unit: 0: KM; 1: MILE;
P03: Voltage level: 24V, 36V, 48V, 60V;
P04: Dormancy time: 0, not dormancy; Other numbers are dormancy times, range: 1-60; Unit minutes;
P05: PAS number selection: 0: 3 file mode; 1: 5 gear mode
P06: Wheel setting: unit, inch;
wheel diameter value: 5.0 ~ 50 Precision: 0.1 inch
This parameter is related to the meter display speed and needs to be entered correctly;
P07: Speed gauge magnetic steel number: range: 1-100;
This parameter is related to the meter display speed and needs to be entered correctly;
If it is an ordinary hub motor, the number of magnetic steel is input directly;
If it is a high-speed motor, it is also necessary to calculate the deceleration ratio, and the input data = the number of magnetic steel × deceleration ratio;
For example: number of motor magnets 20, deceleration ratio 4.3: input data is: 86 = 20 × 4.3
P08: Speed limit setting: Agreement No. 2 range 0-100km / H, 100 means no speed limit;
The input data here represents the maximum operating speed of the vehicle: for example, input 25, indicating that the maximum operating speed of the vehicle will not exceed 25km/h; The drive speed is maintained at the set value,
Error: ± 1km/h; (The speed limit for power and turning is equal)
Note: The value here is based on kilometers. When the unit setting is converted from kilometers to miles, the speed value of the display interface automatically converts to the correct mile value, but the speed limit value data set at this menu under the mile interface is not converted. Is inconsistent with the actual speed limit of the mile speed;
P09: zero start, non-zero start setting: 0: zero start; 1: Non-zero start;(valid for protocol 2 only)
P10: The drive mode is setting: 0: Power Drive(how much power is output is determined by the power file bit, and the switch is invalid at this time).(valid for protocol 2 only)
1: Electric drive(by turning the handle drive, the power file bit is invalid at this time).
2: Power Driven and Electric Driven Coexistence
P11: Help sensitivity setting:range: 1-24;(valid for protocol 2 only)
P12: Help start intensity setting:range: 1-5;(valid for protocol 2 only)
P13: Power Magnetic Steel Disk Type Setting: 5, 8, 12 Magnetic Steel Types
P14: Controller limit value setting:range: 1-20A
P15: Controller under voltage
P16: ODO zero setting: length press key 5 seconds ODO zero
P17 :Automatic cruise optional:0: No enabling cruising, 1: enabling cruising; (valid for protocol 2 only);(valid for protocol 2 only)
P18: Display speed ratio adjustment: range: 50 % ~ 150 %,
P19:Zero PAS selection: 0: 0 file, 1: does not include 0 file
P20 :0:2 Protocol 1:5 S Protocol 2: Standby 3: Standby
WARNING: Only carry luggage in the luggage carrier when riding the E-Bike.
The luggage carrier is not designed to pull a trailer.
When carrying luggage using the carrier, be aware of any reflectors or light that the luggage may block.
Distribute luggage evenly between the two sides of the luggage carrier.
If using straps to secure the luggage, make sure that none of the straps are loose to ensure they don’t get caught in the wheel.
- Children should be supervised to ensure that they do not play with the E-Bike. Cleaning and user maintenance should not be done by children.
- The battery charger may be used by children aged 8 years and above and persons with reduced physical, sensory or mental capabilities or lack of experience and knowledge provided that they have been given supervision or instruction regarding the use of the device in a safe way and provided they understand the hazards involved.
- Do not attempt to modify,change, or open the battery.
- Do not place the battery near any heat sources such as heaters. The battery must not be heated or exposed to open flames.
- Do not subject the battery to heavy impact or throw it.
- Do not submerge the battery in water or let the battery connector become wet.
- Only use the charger included in the box.The E-Bike must only be supplied with safety extra low voltage corresponding to the marking on its battery.
- Do not exceed the maximum weight limit(330lbs/150 kg)
- Do not insert the battery if the battery connector on the E-Bike is wet.Place the E-Bike inside and make sure that the connector on the E-Bike is completely dry before inserting the battery.
- Do not leave the battery in direct sunlight. Do not leave the battery in a vehicle during high temperatures or in other warm locations. This can cause battery leakage.
- Do not charge the battery outside or in areas with high air humidity.
- Do not use the battery if there is any visible damage on it.
- Ensure that the wheels are mounted correctly before riding the bike.
- Learn how to ride and use all functions of the E-Bike before using it in traffic.
- Check that the front light works before riding the E-bike in darkness.
- Always remove the battery before performing any maintenance or installation work on the E-bike.
- If thecharger supply cord is damaged, it must be scrapped, and the charger must be replaced by the manufacturer or its service agent – please contact the service number.
- The included charger is only to be used with this E-Bike and not with any other electronic device. Do not use the charger to charge any non-rechargeable batteries.
- The luggage carrier is not suitable for the attachment of a child seat.
- Do not abuse your E-Bike, as doing so can damage your unit and cause failure to the operating system which can lead to injury.
- Do not ride the E-Bike while wearing loose or torn clothing.
- Safety-critical components should be replaced with genuine replacement parts.
- Please be aware of the specific risk of entrapment during normal use and maintenance on the front/rear wheel, chain, and sprocket.
- Do not modify or change the luggage carrier.
- Be aware of an increased braking distance and difference in steering when the luggage carrier is loaded.
- Make sure that any luggage fitted to the luggage carrier is securely fitted in accordance with the instructions of this manual and that there are no loose straps that can get caught in the wheel.